To be honest. I didn't think I'd be making two posts today. But I was so fascinated by the pictures of Torii Gates that I found on the internet, that I just had to set to and start working on a model of one. I didn't realise I'd almost have one finished by the end of the day. I was so fascinated by the project that I ended up forgetting about dinner until I noticed I was getting very hungry.
What spurred me on the most was finding some writings on the proportions of a Gate. So with that in mind and some 2.5mm styrene tube to hand I set about working up a drawing that I could use. This 1:450 scale model is pretty close to the correct proportions for a Torii Gate.
Once I had the drawing the rest of the way was easy. I just cut styrene tube and strip to size, pinned it on top of the drawing and stuck it all together as in the picture below.
The basic gate was pretty easy. The curved top section, or Kasagi, was a bit more of a problem and I spent quite a while working out how to recreate that part. In the end I didn't model a curve, just a slope. But the effect is still OK. Then a bit of filler later. I had what you see in the picture below. If you must know, the filler is still setting in the picture. But I was so excited by the whole project I had to make this blog entry.
So after the filler has set and I've cleaned it up. I'll give it a coat of red and black paint and it will be done.
Construction was simplicity itself and I spent more time researching the structure and working out how to make it than I did making it.
Friday, February 27, 2009
Balancing act.
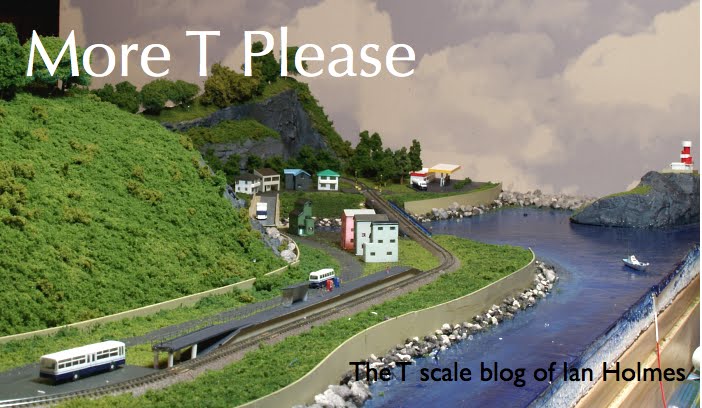
Here are a couple of progress shots with scenic elements (and trains) thrown in there to get a feel for things and one thing is painfully obvious. The layout is off balance. There is more going on on the right hand side (houses, bridges, lighthouse) than the left (erm... nothing much a train dives into a tunnel). Even with a forest atop the hill things will still be off balance. So I really have to have something going on at this left hand side. I had mooted the idea of a Shrine or Castle or something up there for a while but wasn't entirely sure if it was needed. I thought a tree covered hillside might do it instead.
So a shrine it has to be. Somehow I don't think the gods would be best pleased at the thought of a railway diving underneath their shrine. But they'll have to compromise.
So something new to learn about - Shinto Shrines.
The research has started. I've found some pictures of typical entry gates (Torii gates) That should be an interestingly simple structure to start with and set me well on the way.
There's always something about T gauging to keep you interested
Monday, February 23, 2009
Steady Progress
Following on from the successful work on the cliff faces at the left hand side of the layout. I decided to work on the right hand side, where the biggest extent of cliff face will be. After a while it began to look quite acceptable to me. So I added the bridges houses and the roadway (the roadway will, of course be painted a tarmac colour) and took a picture for the records. Methinks it's looking pretty good. You'll also see that I have started to be paint the sea in. But that will be a story for another day...
Friday, February 20, 2009
The lie of the land
Starting work on the scenery proper is always a daunting job for me, whatever the scale of the layout. It's make or break time for it I feel and working in a new scale made things even more nerve wracking.
But today I decided I could put it off no longer and had to get on and start covering the ground with something other than the earth paint from Woodland Scenics. Luckily, I had a lot of various foliage materials to hand and so I just set to and started covering the ground in much the same way as I would if I was modelling in any other scale. At all times I was referring to the pictures on the Gonou photogallery to help me decide what grades of foliage should go where. In the end I ran out of Hob-e-tac used for sticking the foliage to the hillside and had to stop for the day. The following 2 pictures are the results of the days work. The structures have just been put in place to give you a feel for the way it will look when finished.At the moment I'm undecided as to if the road bridge at the rear needs a central pillar or not. I think a structural engineer might just tell me Yes.
The rock faces seen in this picture were very simply created by spreading spackle on the area and shaping it to look like rocks. I then painted it a mid grey and have been dry brushing and adding washes of darker and lighter greys and black on there for added texture and relief. The flattish top of the hill will mainly be covered in trees though I will likely add some kind of structure like a shrine or castle on top, for something interesting to look at.
Monday, February 16, 2009
Earth Movements
Lately there's been some landscaping developments on the layout. Pretty major earth movements when you think about it.
I was, it has to be said, not terribly happy with the shape of the hill massif behind the station. Though I did like the idea of the train running through a deep cutting to the tunnel mouth at the rear of the layout. It just made the hill an awkward shape. So out of curiosity. I added a lump of foam to the front of the layout cut a hole in it for the tunnel mouth and looked at it. Instantly I liked what I saw and I fixed the foam in place and covered it with spackle to create a new landscape. One that I am much happier with. After that had all set I painted the land with woodland scenic earth colour. This gets rid of the blizzard landscape and makes the land start to look like land. Here's the result of that work.
With the track, station and tunnel mouth in place you can see that the layout is really beginning to take shape. The hill looks a lot more believeable than before. The white, by the way, that you see is some extra spackle that will be carved and painted to look like a cliff face. Really I'm very very happy with the way things are progressing.
Tuesday, February 10, 2009
More Gonou line pictures
Regular readers here are now well versed in the inspirational photogallery that started me off on this Odyssey, the Gonou line photogallery. Well, the same photographer has now added some more pictures of this scenic line. These pictures were taken in the winter. You can see them here The sea is rough, the area is covered in snow, but it still looks very scenic.
I'm also drawn to the pictures of the rather brightly coloured DMU in several of the pictures with its red, orange, yellow and black front end it looks like one of those dragons that you see dancing in the streets at Chinese new year celebrations. I like it. I might have to try something like that for my first serious atempt at scratchbuilding some T gauge rolling stock.
Update:
A quick posting on the jtrains group on Yahoo! has lead to the discovery of more information about the colourful DMU seen in some of the pictures on the website.
It is a Kiha 47 resort Shirakami train. Refurbished from the Kiha 40 DMU's to cater for the increased traffic on the line from people visiting the World Heritage site the Shirakami Mountains.
There are three types of train distinguished by their different colour schemes inspired by the area
The Buna, green coloured set based on the Buna trees (Beech trees to Westerners) found in great quantities on the mountains
The Aoike, blue/white colour set inspired by the blue water of the Aioke pool, uppermost of the Juniko water pools on Shirakami mountains.
The Kumagera, based on Kumagera bird (or black Woodpecker) found on the mountains.
This is the set that is pictured on the site.
Fascinating stuff. I'm now going to find out more about the fascinating Shirakami Mountains. Whoever said model railways were boring?
Monday, February 9, 2009
The March of the little people
Yes, dear readers. Its time to be amazed again as something awesome in 1:450 scale has come into my possession.
These etched figures from Eduard of the Czech republic. They are supposed to be passengers for a 1:450 scale model of the QE2. But people are people and this etch of close to 180 people will populate many T gauge layouts, instead of cruising the high seas...
They are tiny, so incredibly tiny. Yet the "painting" of the clothing is awesome. I use the work painting loosely. I'm sure these must have been printed somehow. But I'm not bothered about the technicalities of how they did it. I'm just amazed at what has been done.
As the people are etched out of metal (Nickel Silver I should think) they are thin. Very thin. But then again if you were to scale me and my 33 inch waist down to 1:450 just how thin would I be?
Sunday, February 8, 2009
Terraforming
Terraforming. Magnificent word. Right out of science fiction. I beleive that Terraformers were the principal protagonists in the recent Doctor Who story. "The Doctors daughter".
Terraformers, courtesy of imaginitive writers produce liveable planets out of what was nothing but a dead lifeless rock, basically. In a way that's what I'm up to here. Producing a beleievable model landscape out of nothing much at all.
The picture below shows how everything is starting with the main hill behind the railway station. Nothing could be simpler than cutting some white expanded polystyrene foam insulation to size with a hot wire cutter and shaping it until you're happy. The best part being you don't have to be entirely happy as you can adjust things as you go along. Slice a bit off here, add a bit there. Just glue the stuff in place.
Then cover the white foam with a base material to cover all your additions and subtractions and smooth everything out. My choice material is Lightweight spackle. Its just a pre mixed lightweight filler for filling holes and cracks prior to doing any painting on any household decorating jobs. I like it. I find it easy to handle and if you keep the pot it comes in properly sealed when stored, it keeps for quite some time. The picture below shows the early stages of covering the basic hill shape. When finished it will look like a snowscape. All nice and white.
I haven't quite got there yet. I'm still adding and subtracting and smoothing things out. I'm following the photographs on the gonou line website as a guide. But its a very different landscape to what I'm used to and sometimes I feel like things aren't quite right. But I'm sure everything will sort itself out in the end.
Friday, February 6, 2009
Bridge progress
After all the trouble the building of this bridge gave me to start with. Its nice to report a week of relatively uneventful progress. I gave the structure a first coat of paint. Poly Scale "aged concrete" for the piers and abutments and a model master acryl "French Blue" (that I thought was going to be a bit less glossy than it turned out to be). Then I added some more hand rails from the package of handrails that I used on the lighthouse. These handrails though not easily breakable, do bend under the slightest touch and it is rather difficult to keep them straight and level. So the next progress on this model will be a second coat of paint, then some weathering followed by a spraying with dullcote to take the shine off the blue paint.
Some people might take issue with the painting of this bridge a bright blue. But the simple fact of the matter is this. It seems to be what the Japanese do. I looked at many pictures of bridges while researching this model and if the bridge isn't made from concrete then it's painted in a bright colour. Red, Orange, Blue etc: I don't know why it's just the way that it seems to be. It certainly makes a change from the rusting hulks I see over here.
The next project is the other bridge. A road bridge. That one will be based on a concrete structure.
Sunday, February 1, 2009
Tree reminiscing
The question was recently asked on Talking T gauge about modelling trees in T. This, of course, is something I know a bit about as regular readers of this blog will well know. Whilst researching my answer to the question I realised that I hadn't posted a description of my "tree top matting".
First of all, I must apologise for the quality of some of the pictures. These were grab shots that I used to illustrate the posting and I never got around to taking better pictures. Hitsu of course is gone now and so is the chance to take better pictures. The tree top mat still exists and will be used on Gonou.This is the base material for the mat. Just ordinary kitchen scourer pad. Torn to size and teased out to make thinner.
When you've done that. You cover it with the glue of your choice. As you can see mine was Elmers woodworking glue. In this picture also you can see the packet of the Woodland scenics foliage material I used in the next stage. This was just stuck onto the scourer pad.
That's it really. Quick and easy. No more to making the mat than that.
Next comes installing the mat. Stage one is to clear an area that you want to cover with trees and place some tooth picks in the ground, to raise the mat to what you deem to be a suitable tree top height and place the mat on top of it.
The effect as you can see in the picture below is quite acceptably realistic. The flash from my camera has made the trunks of the trees and the green of the scourer mat more visible than they actually are. Once the mat is installed on the new layout better pictures will follow.
Subscribe to:
Posts (Atom)